
Those tapped into the Salesforce Field Service community are almost certainly aware of the add-on feature Appointment Assistant, which offers a variety of functionalities to help companies better serve their customers. One of those functionalities, Self-Service Scheduling, serves as a substitute for the Lightning Scheduler and can be configured to allow Unauthenticated Guest users to create and schedule themselves service appointments. This is a powerful feature that reduces the load on call centers and scheduling teams, as well as making for a more convenient process for the end customer.
However, this is a young product without robust documentation. Many Salesforce customers and partners have detailed their struggles configuring this feature on online communities, as it’s both complicated and the inner workings of the feature are largely hidden. We recently implemented this feature and would like to share our learnings from the process.
First, let’s review the basics
The first step to getting Self-Service Scheduling set up is to install the Appointment Assistant managed package (as well as Field Service, should you not already have that installed). You can find those instructions here. Next, there are some Self-Service Scheduling-specific prerequisites to do, which you can find in the documentation here. This feature can be configured for both Authenticated users and Guest users for your experience site. For our example, we implemented this feature for Guest users, and that’s what we’ll detail in this article. If you’re looking to implement this feature for Authenticated users, please follow the “Set Up the Experience Site for Authenticated Users” steps in the linked documentation.
From there, review and follow the instructions for two flows: the Authentication Flow and the Scheduling Flow. These out-of-the-box flows work in conjunction with each other, and to begin to customize them, you’ll need to “Save As” the template versions into new versions for you to edit. The highlighted apex action flow element calls the authentication flow, which generates the email to the end user with the authentication code. From there, with the correct authentication code, the user can proceed through the rest of the scheduling flow.
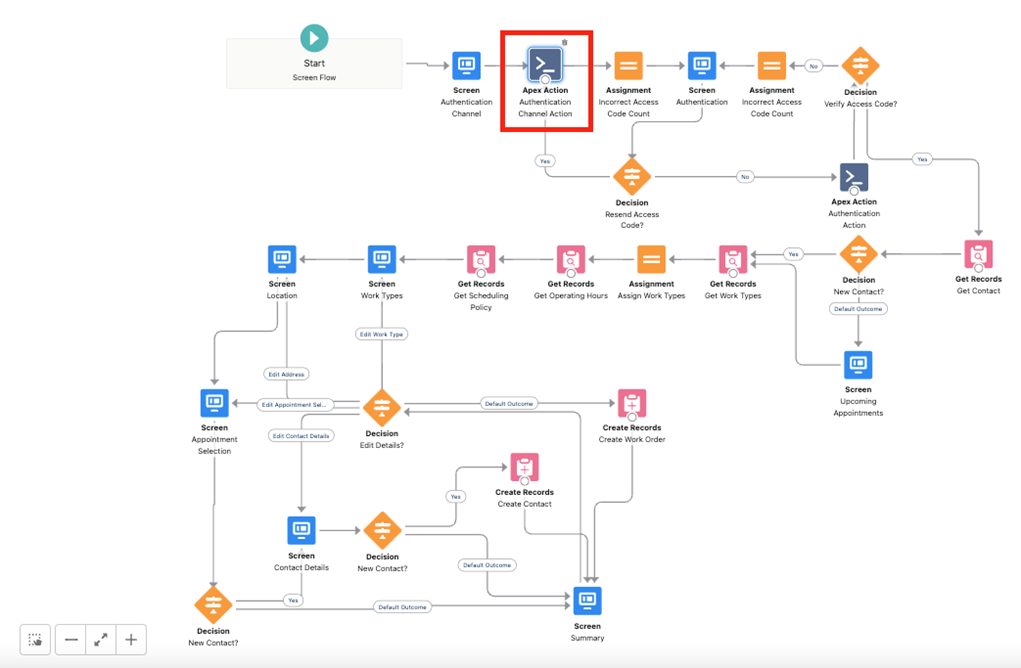
Each of the following screens in the scheduling flow contains a multitude of different variables, all of which are potential failure points for this flow. Most of those variables are detailed in the documentation here, and some we will discuss in greater detail at later points in this blog post. An important thing to note here is that any variable marked as “Locked” in the UI of the screen’s Lightning Web Component should not be changed at the screen level. To modify the value of that variable, edit the default value of the variable from the Flow Resource Manager.
What’s Going on Behind the Scenes?

Each of the highlighted screens in the screenshot above houses a Lightning Web Component from the Appointment Assistant managed package. Let’s walk through each of them one by one:
- Work Types: This screen allows the end user to pick the work type they want to schedule an appointment for. This LWC accepts parameters that change the title of the component, the names and details of the work types, and most importantly, a locked variable for a collection of work type records that will be displayed by the component. This collection variable is set by the “Get Work Types” Get Records element earlier in the flow. Based on the user selection, the LWC sets the variables WorkTypeTitle and WorkTypeId.
Important Note: This screen is not necessary. If you do not want the user to be able to pick a work type, you can set the variables WorkTypeTitle and WorkTypeId in some other way.
- Location: This screen’s LWC takes input from the user and sets the locked variables for City, Country, Postal Code, State, and Street. It also takes presets for these variables, which you would do by setting the default value of the variables in the Flow Resource manager.
Important Note: This screen is not necessary. If you do not want the user to be able to enter a location, you can set the location variables in some other way.
- Appointment Selection: This is probably the most important LWC, as well as the most complex. The user simply arriving on this screen triggers a lot of business logic based on the variables in this lightning web component, and it is the most likely place for a point of failure.
The first thing to understand about this LWC is that it immediately creates some n amount of Work Order and Service record pairings based on the parameters input into the LWC (most of which are locked variables) through calling a method called “Clone SA”. The amount of record pairings it creates seems to equal the parameter “Number of Days in Field Service Settings” (and your input to this parameter should be the same as the value in the Maximum Days to Get Candidates or to Book an Appointment field in your Field Service Settings). So, if you have the value 3 for that parameter, the system will create 3 Work Orders and 3 Service Appointments. Then, it will call a method called “getSlots” for each of these Service Appointments, appending the slots it gets for each Service Appointment to a single list and then presenting that to the user. The LWC then deletes the Service Appointments and Work Orders.
It’s important to understand this as most errors on this page will not be possible to find through normal Salesforce Admin methods of debugging. If you are running into issues with this LWC, you will likely not find any useful information in normal debug logs or flow error logs. Instead, you may need to operate on trial and error. Because this LWC is creating records, consider turning on and off the apex triggers, record triggered flows, and process builders on the Work Order and Service Appointment objects to pinpoint the source of the issue.
Issues could also arise from the parameters input into this LWC. As always make sure that you are not changing the input for any parameter that is marked as locked – if you need to change the value that is being input, make sure you do that by changing the value of the locked variable in the resource manager, not changing the variable you input for the parameter. Additionally, check where each of these locked variables are being set and make sure the values are correct and set before the Appointment Selection screen.
- Contact: This LWC operates largely as you would expect – it takes locked input variables to set default values for user input fields and sets those same variables on output. If on the “New Contact” path, it uses those variables to create a new Contact record, and if on the “Edit Details?” it uses those variables to update the fields on the existing Contact record.
- Summary: This is the final screen of this flow. On this screen, the LWC takes parameters and finally creates and books the final Service Appointment, after which the corresponding Work Order is created in a separate flow element. All these variables are locked and should’ve been set earlier in the flow, so there shouldn’t ever be much customization required on this screen. One thing to understand about this LWC is that it also sets edit routing – if a user selects the edit button next to any of their appointment information instead of choosing to finalize it, the LWC will set a variable called “BackToStep” that will determine which screen the user is taken back to.
Important Note: If you are encountering a nondescript error upon clicking the “Book Appointment” button on this screen, you are likely experiencing a known issue with your org’s Field Service Mobile Settings. To work around this, search “Field Service Mobile Settings” in Setup. Click show details on the record named Field Service Mobile Settings and clone it. Uncheck both “Send appointment notifications on assignment” and “Send appointment notifications on dispatch” on the cloned version and assign the new cloned version to your experience site’s guest user profile.
Final Thoughts
The Appointment Assistant Self-Service Scheduling feature is very powerful and can help improve the lives of your end users. However, it is a complex and opaque configuration, and it can be difficult to understand what modifications can be made to the base configuration without breaking the process. Having performed these implementations, our recommendation is to successfully implement the feature exactly as described in the documentation, and then slowly, one by one, make changes to that base configuration so that you have time to evaluate if the process still works and how the change will affect it.
Additionally, should you try and implement this feature, we recommend heavily utilizing your browser’s developer tools while debugging this process. Because LWCs from managed packages have their code and logs hidden, the only way to get any error messages is out of the Javascript debug logs that will be available in your browser’s console. To open developer tools on Chrome, open the menu in the upper right-hand corner and select More Tools -> Developer Tools. Alternatively, use Option + ⌘ + J (on macOS), or Shift + CTRL + J (on Windows/Linux).
Want expert help in setting up Appointment Assistant Self-Service Scheduling?