
Introduction
Since its release, LWC has been instrumental in taking Frontend development on Salesforce to the modern age. Introducing Salesforce developers to concepts such as components composition, re-usability, and localized styling, closing the gap between UI development on the platform and popular modern JavaScript technologies outside of it.
Yet, we can still be inspired by patterns and abilities we can find in these libraries that don’t exist out-of-the-box in LWC. Amongst these techniques, borrowed from the earlier days of React.js, is the powerful and versatile concept of Higher Order Components.
As stated in the React docs, a higher-order component is a function that takes a component and returns a new component. You may say “Well, this sounds pretty useless”, but it actually has many (endless!) uses. As we will see shortly, this pattern allows us to reuse non-visual component logic, in a maintainable and efficient way. In other words, we can build a set of reusable ”abilities”, and then apply any combination of these abilities to any component we wish, both old and new.
Let’s demonstrate this with a basic “Hello World” example. This will allow us to get an understanding of the fundamentals of this pattern, before moving on to showing some more useful real-world examples.
Hello World Example
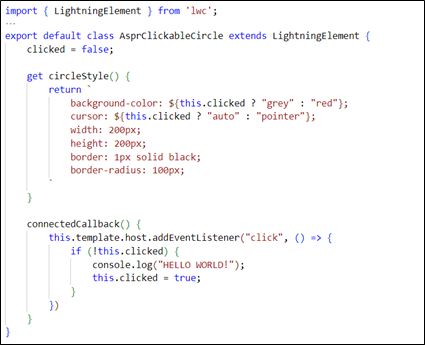
Let’s begin with a simple red circle component:
Now, let’s say we want to add a logging ability to our circle, so that when we click on it “HELLO WORLD!” will be logged to the console. While there are a variety of methods to do this, a generic way would be to add a click event listener to this.template.host. We also want our component to only be clickable once, and after it’s clicked it turns grey to indicate that. Here’s a possible LWC implementation of these requirements:
That’s all nice and neat, but what if we would want to add another shape to our little app, let’s say a square, that will also log “HELLO WORLD” when clicked? We wouldn’t want to just write the same code in our new square component, because that would be a waste of our precious time. We need to move the implementation of that functionality somewhere else. The question is: where?
One option could be to use composition, meaning creating a third component with the logging functionality, then rendering our circles and squares different as child elements (slots). While this is a very good choice in some cases, it doesn’t work as well for this use case: it adds another HTML layer that’s unnecessary for such a small feature, and that problem will only get worse if we have more of these little “mixins” that we try and combine.
This is where our Enhancer Pattern comes into play. Instead of creating another component, we will create a Higher Order Component, and apply it to our original component using a special utility function. We’ll now proceed to look at the enhancer itself, then the utility function, then how it all comes together in the new version of our circle and square components.
We’ll dive straight into our enhancer code, then break it down line-by-line:
As we can see, an enhancer fulfills several key characteristics:
- Return type – an enhancer must return a function. In turn, this function also has a specific structure: it receives a component as a parameter and returns a new component that extends the input component. This three-level design is meant to allow the enhancer to also receive parameters, as we’ll see in subsequent examples.
- Calling super() in the constructor – as we’re extending the original component, we need to call super() to initialize the new component properly.
- It adds special functionality in two possible ways:
- property/method – the enhancer can add a property or a method. These will then be accessible in the original component code because the two components’ prototype chains will be connected.
- Lifecycle Hook – the enhancer can implement one or more of the LWC Lifecycle Hooks, that will be triggered in its appropriate time.
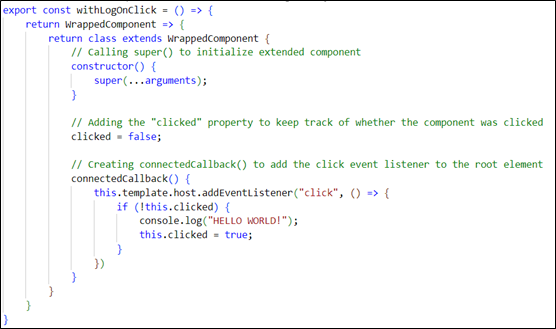
In this specific example, the enhancer adds one property and one lifecycle hook:
- clicked (property) – this property keeps track of whether our component was clicked or not, to enable conditional styling in the original component.
- connectedCallBack (lifecycle hook) – when the component loads, we attach a click event listener to this.template.host. When the user clicks the component, we check if it was already clicked. If not, we log “HELLO WORLD!” to the console, and change this.clicked from false to true.
After we’ve built our enhancer according to the pattern, let’s move on to looking at the “enhance” utility function, and understand how we apply it to our components:

This function is very short, but it does quite a hefty job! It receives two arguments:
- component (LWC) – the component to be enhanced.
- enhancers (list of functions) – a list of enhancers to be applied to the component. As we will see in the usage example below, these need to be invoked calls to the enhancer, so the function gets the inner function inside the enhancer. This is built this way to enable passing parameters to the enhancer.
It then uses the JavaScript reduce array function to accumulatively apply each of the enhancers to the component. It returns the result of the reduced call, which is – yes, you’ve guessed right – our enhanced component!
Finally, let’s see how this all comes together in the new version of our circle component:
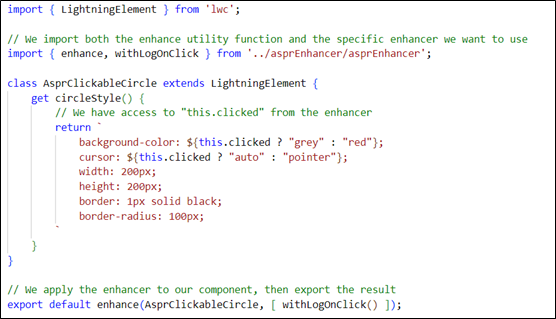
Hopefully, by now the different pieces in play can make sense! A few things to note:
- Notice the way we use the enhance utility function, and how it differs from a regular LWC. A key difference is that we don’t export the class directly, but instead, we export the result of the enhance function. We pass our component to it, alongside the list of the enhancers we want to apply.
- Notice how we invoke the enhancer when calling enhance. While in this case, we don’t pass any parameters, this is where we can do so to provide the enhancer with specific information for our component. We’ll see an example of this in the subsequent examples.
- Notice how we’re using the information supplied by the enhancer. In the circleStyle getter, we apply conditional styling according to the state of this.clicked. While it seems that the property magically appeared, it actually comes from the enhancer, allowing us not to worry about that logic in each component.
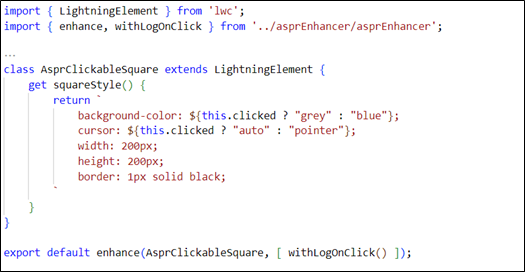
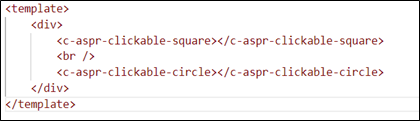
We can now use the same method to build our square component:
Now we render the two components side by side in a parent component:
And here is how it looks in action:
Real World Examples
In this section, we are going to demonstrate two real-world examples of using enhancers. We will present the two problems at hand and how they can be solved by using enhancers, and finally show an example that uses both of them and ties it all together.
Example #1: withDependencies – external resources enhancer
One of LWC’s differences from other modern JavaScript frameworks is how we load and use external JavaScript and CSS. Since LWC is not a Node.js project, we can’t benefit from package management through npm or Yarn. Instead, loading external resources is done through uploading scripts and stylesheets as static resources, and then using the platform-provided functions loadScript and loadStyle to load them through a component.
These functions, though, present some challenges. Namely:
- Boilerplate: hooking up these methods to a component takes quite a few lines of code, normally using it in the connectedCallback lifecycle hook.
- No isLoading flag: in most cases, we need to track whether the resource has loaded, to know if we can use it safely. This ability is not provided out-of-the-box and needs to be implemented in each component individually.
- Potential performance issues: it is not uncommon that several components need to load the same resource. For example, two datepickers that use Moment.js, or two types of table rows that both use CSS customizations of SLDS. This can lead to the same resource being loaded multiple times. Other than this duplication being unnecessary, it can also lead to severe performance issues. Especially in the case of CSS, loading a lot of stylesheets adds a hefty performance burden to the browser, and can drastically slow down an application.
To address all of this, we’re going to introduce – you guessed right once more – a new enhancer!
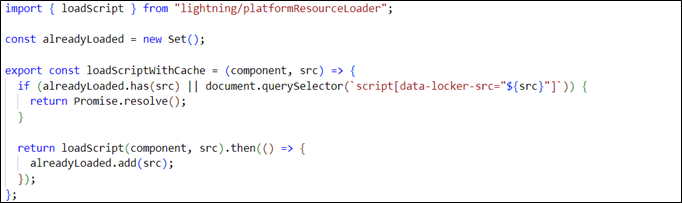
This enhancer leverages two custom helper functions, loadScriptWithCache and loadStyleWithCache. These functions are going to help us with the third problem listed above, by employing a simple (yet effective!) caching mechanism to prevent the loading of a resource already loaded to the browser.
loadScriptwithCache.js
loadStyleWithCache.js
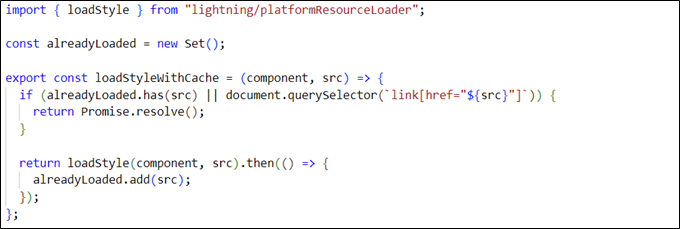
As you can see, both functions work in a similar way. The signature of each function is similar to their platform-provided equivalent, getting the component instance and the static resource as arguments, and returning a Promise that resolves when they are loaded. On top of the regular functionality, they add a simple caching mechanism. Using a closured set of alreadyLoaded, we are able to check if this resource was already loaded through this function in the current running time of our app (since the last refresh). In addition, we are checking through document.querySelector if the script/style already exists on the document. If the resource was already loaded, the function just returns an already resolved Promise. Otherwise, we load the resource and then add it to our internal set.
Now, let’s see how we incorporate these functions in our new enhancer, that will help us solve the first and second problems listed above:
withDependencies.js
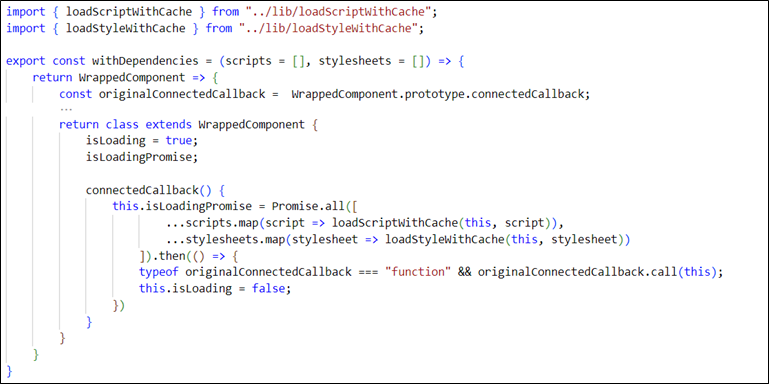
This enhancer is slightly more complex than our Hello World example, demonstrating a few key techniques in the enhancer pattern.
First, we are using the enhancer’s capability of receiving parameters. The enhancer gets the scripts and stylesheets required to be loaded as parameters and used as a closure in the returned inner function.
Second, we are overriding the connectedCallback lifecycle hook. As mentioned before, this requires a bit of extra caution! At the beginning of our inner function, we save the reference for the original connectedCallback from our enhanced component. This is necessary in order not to override the function in the original component if it was implemented. You can see that in our new connectedCallback, we make sure we call this original function after we’re done with the custom logic. We would need to do this for every lifecycle hook we override in our enhancers.
We can now turn to speaking about the actual functionality of this enhancer. The enhancer adds two new properties to our component: isLoading and isLoadingPromise. They are both used to track the loading state of our dependencies but in a slightly different way. isLoadingis a simple Boolean flag, which is set to false as soon as the dependencies are loaded. We can use it in our component as an input to a <template if:false={isLoading}>, for example. isLoadingPromise is a slightly more advanced layer of information. You can see that in our connectedCallback, we initiate a Promise that will load all of our dependencies with our custom functions. The result of that promise is put in isLoadingPromise, which allows us to then refer to it in our component in different ways, the most common one would be to use then() to run a piece of code once the promise is resolved.
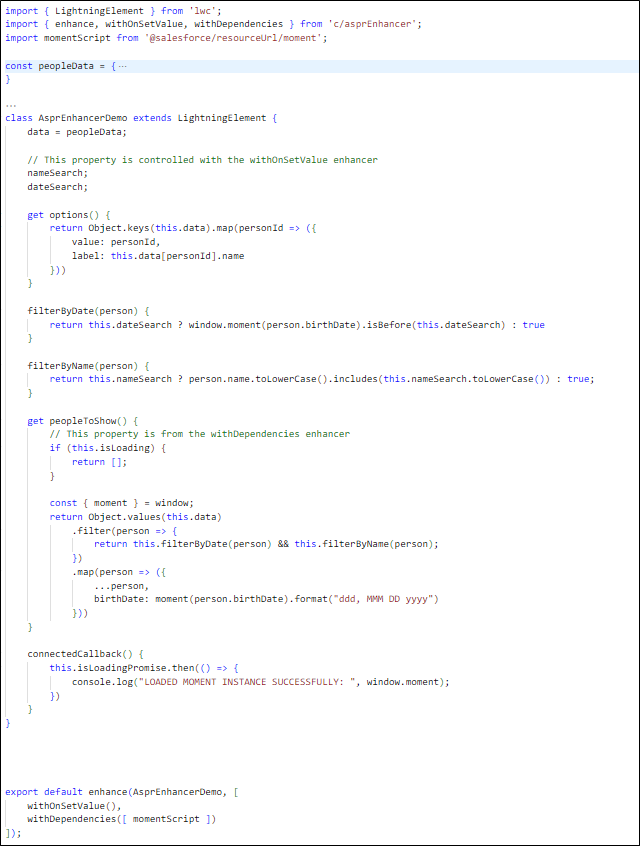
All the theory is done now, so let’s get down to the example! In the example, we want to render a simple list of people (saved in peopleData), with their birthdays – but formatted with moment.js. We’ll use our enhancer to load moment.js, and then use the isLoading and isLoadingPromise in our component. This is how it looks:

Now let’s dive into the code:
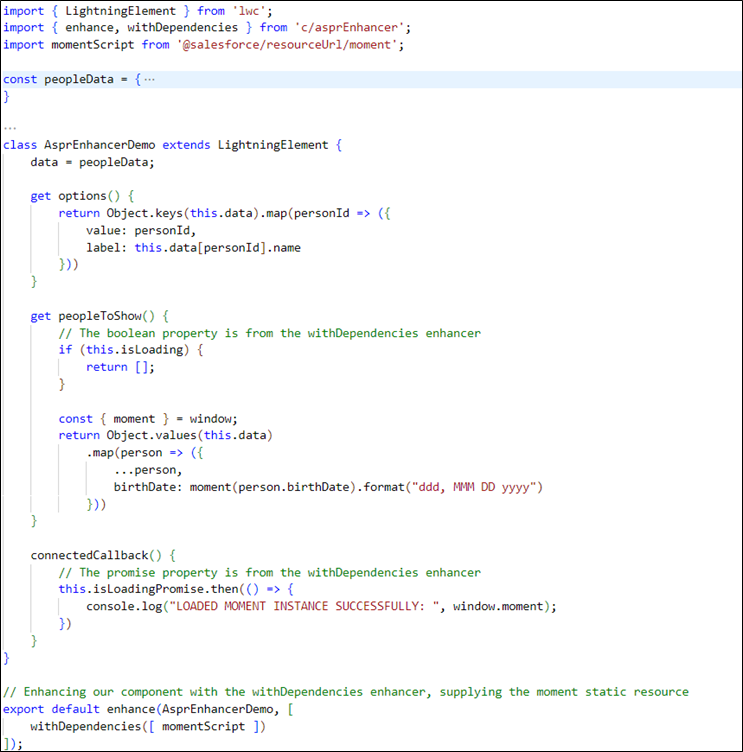
asprEnhancerDemo.js (dependencies-demo branch)
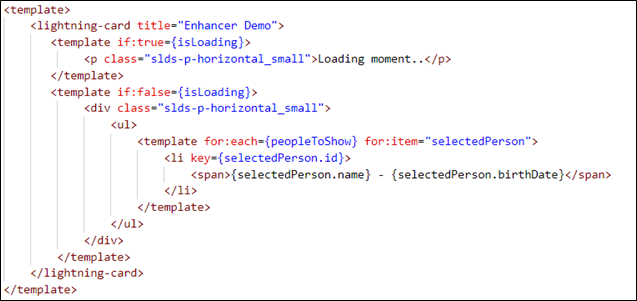
asprEnhancerDemo.html (dependencies-demo branch)
We’ll now go over how we use our new superpowers in our components to make our lives easier!
Notice the way we bootstrap our enhancer at the bottom of the file. It is the same as our previous example, but this time there is an important difference: we supply our enhancer with a parameter, which allows us to customize its behavior for our own specific needs.
As mentioned before, the enhancer then loads moment.js under the hood, and supplies us with its two key properties:
- isLoading (Boolean) – we use this property inside the peopleToShow getter. If its value is true, meaning moment.js has not been loaded yet, we return an empty list. At the same time, we display a loading message in our HTML template. Otherwise, we know we are safe to use moment.js, and we return the list of the people with their birthdates formatted with the library.
- isLoadingPromise (Promise) – this property is only used for logging purposes to demonstrate its use. In our connectedCallback, we use the then() method of the promise to log to the console when it’s done loading our dependencies. This is equivalent to “subscribing” to an onload “event”, and can be used to attach event listeners to the DOM, notify another component of the loading event, etc.
The rest of the component is pretty straightforward, using standard LWC techniques. In the last part of our post, we are going to develop our component a bit more using another enhancer that can save us lots of lines of code!
Example #2: withOnSetValue – easy-peasy bindings
For the next stage of our component, we would like to add filtering abilities to our list of people. We would like to have a filter by name, as well as a filter by date of birth. This kind of requirement is very common in LWC, and could be added to our component without an enhancer in the following way:
While this implementation is quite straightforward, there is one piece of code that is not very scalable! If you look at the onSetNameSearch and onSeteDateSearch methods, they look suspiciously similar. This is not so bad when we only have two filters, but imagine we had 5, or 10, or 20? We would have to create such a change handler for each one of them, although the logic it performs is very simple and similar. Here comes a new enhancer, withOnSetValue, to the rescue:
withOnSetValue.js
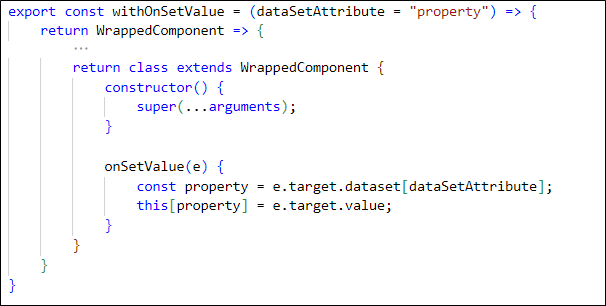
This enhancer is very short and simple, as it should be. We strive not to pack too many features in one enhancer, as it’s better practice to have small and focused enhancers and then combine them as needed. This enhancer leverages the dataset property of the HTML element that triggered the event. This allows us to pass data to our method through a data-* attribute on our elements. This * defaults to “property”, but can also be customized through the enhancer parameter. As we’ll see in the usage example below, that’s how we supply the name of the property that stores our data (i.e. nameSearch and dateSearch). This name is then used as a dynamic object key on this to re-set the property in question with the user input.
Here is how we use the enhancer to rewrite our filtering abilities:
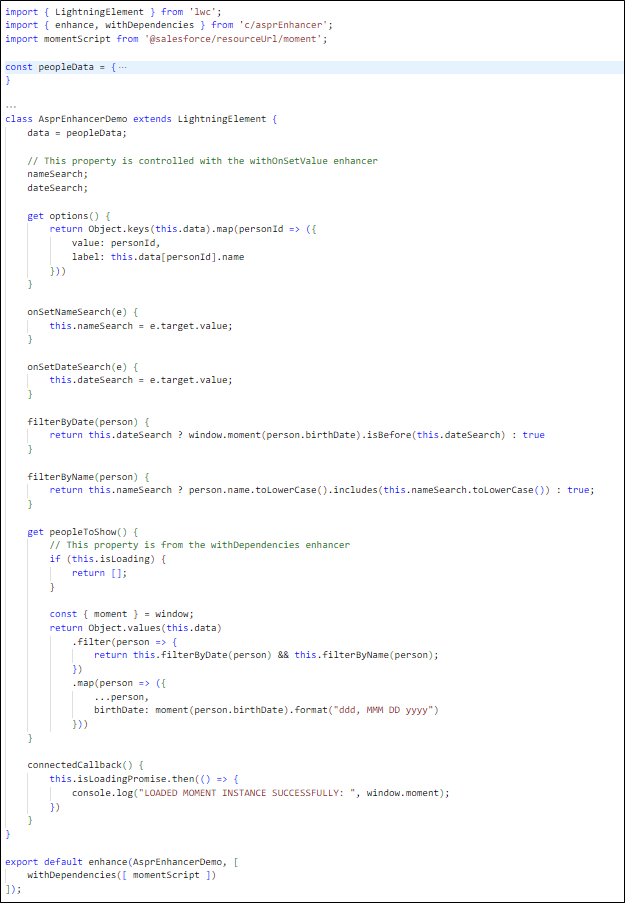
asprEnhancerDemo.js (master branch)
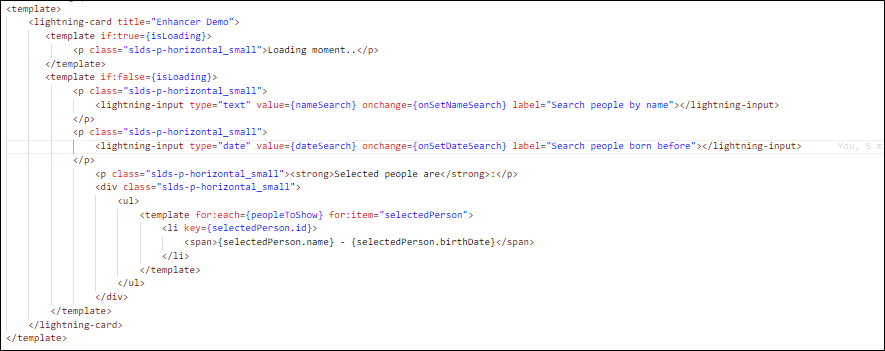
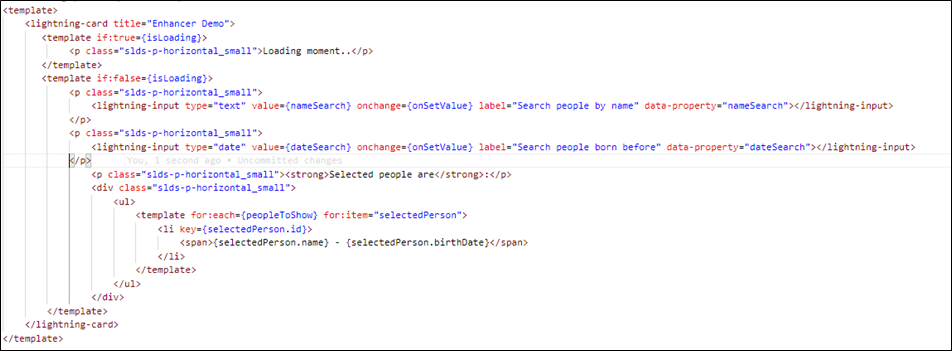
asprEnhancerDemo.html (master branch)
Let’s see what changes we had to make to incorporate our enhancer!
In our JavaScript file, we only had to add the enhancer itself. This also acts as an example of a combination of enhancers, as we’re using the new enhancer alongside withDependencies from our previous example. Apart from that, we also happily deleted onSetNameSearch and onSetDateSearch, as this will now be a part of the enhancer’s work.
In our HTML file, we made two alterations to our inputs:
- For the onchange handler, we pass the onSetValue method. This is the method supplied to us by the enhancer.
- We added a data-property attribute to each one of our inputs, with the name of the variable we want to control with this input. This is how onSetValue knows which property it needs to change.
And that’s it! Our filtering mechanism is working smoothly now, with much less boilerplate written, and in a more easily scalable way. You can see it in action below:
This brings the post to an end! All the code can be found in the dedicated repository, and you can push it to a scratch org to play around with it yourself. Hopefully, you will also be inspired to create your own enhancers, and start pimping up your LWCs with all kinds of new superpowers!
Want to know more?
*You can find the code here